DIY Cable Railing for Decks: The Ultimate Guide
Deck railings play a crucial role in keeping your space safe, but they can also be a key part of your deck’s overall look and feel. Cable railing systems are becoming more and more popular for their sleek, modern design. Here’s everything you need to know about DIY cable railing for decks.

Table Of Contents
Benefits of Cable Railing
Aside from the main purpose of any railing – protecting people from falling off the space – cable railing can bring some unique benefits to any space it’s used in, including:
- Clear Views: The thin, horizontal lines created by the cable allow for clearer views of the surrounding landscape compared to bulky wooden or vinyl bars.
- Modern Style: Cable has a sleek, modern design that complements contemporary architecture, especially when using metal posts.
- Durability: Made typically from stainless steel, cable railings can withstand a wide range of intense environmental conditions.
- Low Maintenance: Cable railing requires far less upkeep compared to traditional wooden railings.

Related Article:
Is Cable Railing Safe for Decks?
Absolutely! When properly installed and maintained, cable railing offers a sturdy and safe barrier for any space. The key is ensuring that the system is installed according to local code requirements, the cables are tensioned correctly, and the entire system is periodically inspected for any signs of wear or slack.
Cable Railing Code Requirements
Building codes vary by region, but when it comes to DIY cable railing for decks, most codes have requirements around:
- Height: Typically, railings must be at least 36 inches tall for residential and 42 inches for commercial settings.
- Spacing: The space between cables should not allow a 4-inch sphere to pass through – this protects small children or pets from slipping through.
- Force & Load: Handrails, guardrails, and structural supports of a railing system are required to withstand 200 lbs of concentrated force in any direction, and intermediate structures are required to withstand 50 lbs of concentrated force.
While these regulations are typically included in most building codes, it’s crucial to consult your local building codes before installation to ensure that you have the most accurate information for your particular location.
Related Article:
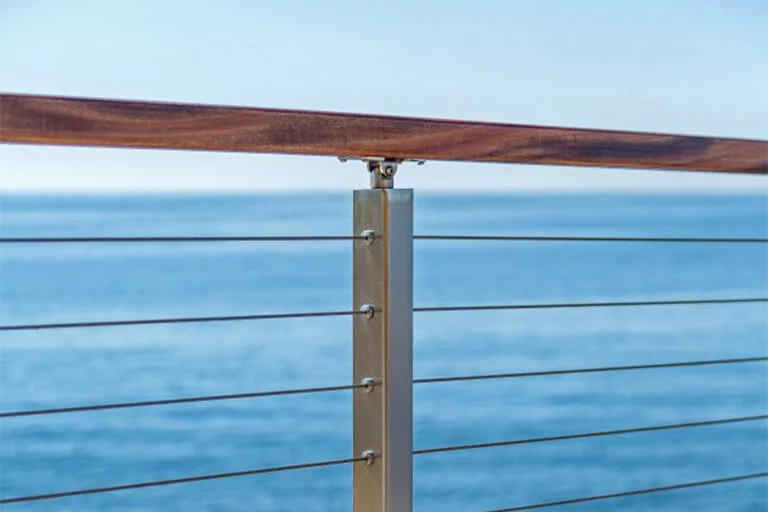
Cable Railing Posts and Hardware
A cable railing system is made up of many parts, but each part can typically be put in one of four categories: posts, handrail, fasteners, and infill.
- Posts: Cable railing posts are made of either metal or wood and are main the structural components of your railing system
- Handrail: Cable railing handrails are also made of wood or metal, but serve the primary purpose of giving you a support to hold onto while walking by, near, or around the railing.
- Fasteners: Cable railing fasteners are the small components that hold your system together. At Viewrail, fasteners are grouped together in “kits” that either mount the infill inside a post, or tension the cables at the end of a railing run.
- Infill: “Infill” refers to the cable wires themselves. At Viewrail, our cable railing systems can be upgraded with slim, metal rod infill, which gives the same appearance as cable infill, but is built for added durability and can be powder coated black for an even more modern look and feel.
Related Articles:
How to Maintain Cable Railing
One of the benefits of cable railing is that it requires far less maintenance than traditional wood railings. To keep your system in good shape, simply:
- Check cable tension periodically and adjust if necessary using an Allen wrench.
- Inspect for rust or wear, especially at connection points.
- Wipe off spots of corrosion with stainless steel cleaner – like Marine 31 Polish and Sealant – and a rag.
Especially for outdoor deck projects, we recommend applying Marine 31 Polish and Sealant to exposed stainless steel (like the cables themselves) for an added layer of protection.

How Much Does Cable Railing Cost?
Cost varies depending on material quality and design complexity. At Viewrail, the pricing difference generally breaks down to:
- Aluminum Systems: $150-240 per linear foot
- Stainless Steel Systems: $215-285 per linear foot
One of the benefits of DIY installation is that you can save big on labor costs, which typically ranges from $65 to $85 per hour.
Related Article:
How to Install DIY Cable Railing on Your Deck
At Viewrail, we engineer our cable railing systems to be simple to install. Our posts have pre-drilled holes, eliminating a time-consuming and complicated step in the installation process. And our fastening and tensioning hardware is easy to use, especially when using the installation toolkits we offer.
The installation process can be broken down into a few simple steps:
- Plan & Measure: Ensure post locations are marked and spaced correctly (no further than 4 feet apart).
- Secure Posts: Anchor posts firmly into the deck using the provided hardware.
- Thread Cables: Thread each cable wire through the pre-drilled holes in the posts, crimp the ends of each run, and secure the line using the appropriate hardware.
- Tension Cables: Adjust to desired tightness, ensuring even tension across all cables.
Related Article:
Pros and Cons of DIY Cable Railing Installation
If you’re reading this article, you’re already interested in trying your hand at a DIY cable railing installation. But if you’re still on the fence, there are a few pros and cons worth considering:
Pros:
-
- Cost Savings: DIY installation eliminates labor costs, which can be hefty.
-
- Control: When you install your system yourself, you have much more control over your timeline and don’t have to worry about contractors coming in and out of your space.
Cons:
-
- Time-Consuming: Installing cable railing can require significant time, especially for beginners.
-
- Potential Errors: Mistakes can lead to safety hazards or visual issues like scratches or dents.
-
- Code Compliance: Ensuring the railing meets local building codes can be challenging.
Related Article:
Two Stellar DIY Systems
If you’ve decided the DIY route is right for you – we’ve got the perfect cabling railing system just for you.
Our Express Cable Railing contains every piece you will need to install your system from scratch. Express cable railing is almost indistinguishable from our Signature cable railing, but it’s not as custom, and therefore easier to install and you can get it quicker. Additionally, you’ll be able to access helpful video tutorials to assist you along the way.

Or, if you already have pre-existing posts, you can install our DriveTite kit for an unobstructed view of your space. DriveTite kits empower you to drill cable wire infill directly into new or existing wood posts, and they install even faster than our DIY Express cable.

Get Started Today
Cable railings provide a safe and stylish option for decks. With proper installation and maintenance, they create a secure barrier and add a crucial layer to the overall look and feel of your space, making them a top choice for many homeowners and building professionals today. If you’re ready to take your deck to the next level, reach out for a free quote today.